Decoration Engineering of Steel Structure
- 06 Aug 2019
- steel structure
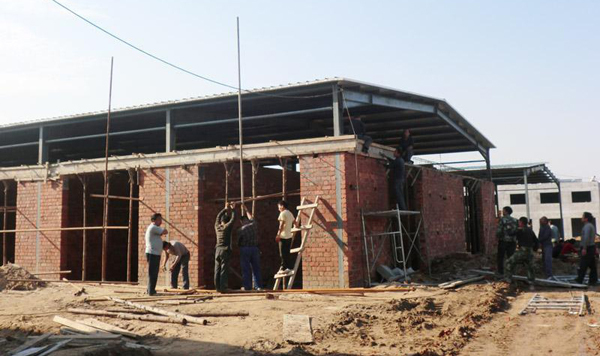
Steel structure masonry wall engineering
1.Aerated concrete block:
Specifications: length(mm): 600 height(mm): 250 thickness(mm): 200
Masonry mortar: The mortar is mainly made of cement, medium sand, limestone, additives and other materials.
2.Main Machinery:
2.1 Tools: Fixtures, hand saws, gray buckets, shovels, crowbars, trolleys.
3.Operating Conditions:
3.1 Before the construction of medium-sized block masonry, we should compile the construction plan, prepare the construction equipment, make the layout of the construction plan, divide the construction section, and arrange the construction flow and the cross-linking construction of the working procedure according to the characteristics of the masonry and block, the requirements of the design drawings and the specific conditions of the site.
3.2 Before the construction of medium-sized block masonry, the basic works must be completed and the procedure of hidden inspection and pre-inspection must be completed.
3.3 Place the position lines of masonry wall, doors and windows, etc. The experience lines meet the requirements of the design drawings, and the pre-inspection is qualified.
3.4 According to the need of masonry operation, find the elevation and erect the rod and ruler.
3.5 Set up operation and unloading rack.
4.O perating Technology
4.1 Technological process

4.2 Wall laying-out: Before masonry construction, the base or floor structural plane should be leveled according to the elevation, and according to the masonry drawing, the axis of the first skin block, the margin of masonry and the opening line of the tunnel should be released.
4.3 Block Arrangement: According to the block arrangement chart, the blocks are divided into sizes and lines within the wall line. The methods and requirements for arranging the blocks are as follows:
4.3.1 Block masonry before masonry, according to the engineering design and construction drawings, combined with the variety and specifications of blocks, draw the arrangement of block, after examination and verification, block arrangement according to the drawings.
4.3.2 Blocks should be arranged from the ground or foundation, +0.00, and the main specifications should be adopted as far as possible. The main specifications of blocks should account for 75%-80% of the total.
4.3.3 The upper and lower layers of blocks should be built by staggered joints. The length of the laying is generally 1/2 of the block, not less than 1/3 of the block height, nor less than 150 mm. If the length of the staggered joints can not meet the requirements of the laying-up, the measures of pressing steel mesh should be adopted, and the concrete structure should be designed according to the requirements.
4.3.4 At the corner of the outer wall and the junction of the vertical and horizontal walls, the blocks should be divided into skin bites and staggered layers. If the bites cannot be bitten, other structural measures should be taken according to the design requirements; the vertical joints of the masonry and the edge lines of the doors and windows should be avoided from the same joints, and brick lining should not be used.
4.3.5 The thickness of horizontal gray joints of masonry is generally 15 mm. If the masonry is reinforced with mesh, the thickness of horizontal gray joints is 20-25 mm, and the width of vertical gray joints is 20 mm. For vertical joints larger than 30 mm, C20 fine stone concrete is used for filling.
4.3.6 The arrangement of blocks should be as far as possible without or with less bricks. When bricks must be inlaid, the whole bricks should be laid flat and dispersed as far as possible. The strength of the inlaid bricks should not be less than the strength grade of the bricks.
4.3.7 When there is a contradiction between the location of the block wall and the structural component, the component layout should be satisfied first.
4.4 Making mortar: Making mortar according to the variety and strength of mortar required by design. Mix proportion should be determined by laboratory. Weight ratio should be adopted. Measurement accuracy should be (+2%) of cement. Sand and plaster should be controlled within (+5%) and mechanical mixing should be adopted. Mixing time should be no less than 1.5 minutes.
4.5 Mortar paving: Mixed mortar is transported to the masonry site by a crane. Before the block is put in place, large shovels and gray spoons are used to pave the block. The length of small blocks and large ash paving should not exceed 1500mm.
4.6 Block placement and rectification: The day before block construction, it should be watered and wetted to wash away the floating dust and remove the debris on the surface of the block before it can be lifted and transported in place. Masonry in place should be far, near, down, up and down, inside and outside; at the beginning of each floor, it should start at the corner or at the location of blocks; one skin should be hanged and corrected, and the skin tension line should control the elevation of masonry and the smoothness of the wall.
When installing steel block, lifting block should avoid eccentricity, so that the bottom of the block can fall horizontally; when in place, it is controlled by hand, aiming at the position, and slowly falling down, through a small crowbar micro-pry, hanging up with a supporting plate and checking up.
4.7 Vertical Joint Grouting Mortar: After each skin block is put in place and corrected, the vertical joint is grouted with mortar, and then the concave joint (original slurry joint) of the ash joint is carried out. The depth is generally 3-5 mm.
5.quality standard
5.1 Guarantee Project:
The technical performance, strength and variety of medium-sized blocks and raw materials used must conform to the design requirements, and have a factory certificate, which stipulates that the test items must conform to the standards(2)The strength grade of mortar must meet the design requirement. The test block should be made according to the stipulation. The compressive strength grade should not be lower than the design strength.
5.2 Basic Projects:
5.2.1 The masonry staggered joints shall conform to the regulations, and no vertical through joints shall appear. The size of the pressure joints shall meet the requirements of this standard.
5.2.2 The corner and the junction must be built at the same time, and the slant joint must be left when the joint is retained; the grey joints are uniform and uniform.
5.2.3 The masonry mortar should be compact and the blocks should be smooth. No cracks or loosening should occur.
5.2.4 The specifications, roots, spacing, location and length of tied steel bars and reinforcing steel meshes shall meet the design requirements.
5.3 Permissible deviation of medium-sized block masonry:
| No. | Item | Allowable deviation(mm) | Inspection methods | ||
|---|---|---|---|---|---|
| 1 | Axis position | 10 | Theodolite, Level Inspection and Construction Record Inspection | ||
| 2 | Foundation or floor elevation | ±15 | Theodolite, Level Inspection and Construction Record Inspection | ||
| 3 | Verticality | Each floor | 5 | Lifting line inspection | |
| Full height | Below 10m | 10 | Theodolite or sling inspection | ||
| More than 10m | 20 | ||||
| 4 | Surface smoothness | 10 | Inspection of 2m long ruler and plug ruler | ||
| 5 | Flatness of Horizontal Grey Joint | Dry wall | 7 | Inspection of 10m Long Drawing Wire and Length | |
| Mixed wall | 10 | ||||
| 6 | Horizontal Grey Joint Thickness | +10;-5 | Size inspection | ||
| 7 | Vertical seam width | +10;-5 | Size inspection | ||
| 8 | Width of door and window opening (rear stopper frame) | +10;-5 | Size inspection | ||
| 9 | Clear water wall misalignment | 2.0 | Lifting line and gauge inspection | ||
6.Protection of finished products
6.1 The equipment slots on masonry are mainly reserved. When they are buried or not reserved, measures should be taken to avoid damage to the integrity of masonry due to chiseling.
6.2 Ground-falling mortar should be removed in time in masonry construction of steel structure.
7.Attention should be paid to quality problems
7.1 The bonding of masonry is not strong: the reason is that the watering and cleaning of blocks are not good, the area of mortar paved once is too large and the correction is not timely; the block should be fully watered and wet the day before the masonry is used, and the surface of the block should be cleaned up with hoisting; the block should be corrected in time after it is in place, followed closely by mortar (or fine stone mixing). Consolidated soil) irrigated vertical joints.
7.2 The uneven thickness of the bottom mortar of the first skin block is due to the fact that the base has not been leveled with fine stone concrete beforehand, which will inevitably result in the uneven thickness of the ash joints in the masonry, so attention should be paid to the leveling of the masonry base.
7.3 Tensile or compacted reinforcement meshes do not meet the design requirements: Tensile bands, tensioned reinforcement and compacted reinforcement meshes should be set up in accordance with the design and specifications.
7.4 The staggered joints of masonry do not conform to the design and specifications: they are not constructed according to block arrangement. Pay attention to the specifications of the blocks and correct assembly.
7.5 The deviation of masonry is beyond the stipulation: the height of each skin block is not accurately controlled. The height of the flag pole should be strictly controlled and the thickness of the ash paving should be controlled.
8. Quality Records
This process standard shall have the following quality records:
8.1 Qualification Certificate of Block and Raw Material Exit from Factory.
8.2 Construction test report.
8.3 Data of construction block drawing.
8.4 Quality inspection and evaluation data.
Plastering engineering of steel structure
1.Construction preparation
1.1According to the construction drawings, the quantity of materials needed for plastering is calculated, and the date of material entry is put forward. The material entry is organized in batches according to the material plan, and the material processing is solved centrally. According to the characteristics of the project, mechanical equipment and plastering tools are prepared.
1.2 finish the Material Testing and Matching.
1.3Before plastering, inspect steel structure engineering and other cooperating work items to ensure that plastering quality and progress are not affected by them.
1.4 Mortar mixer, trolley, wooden plaster and other equipment are fully equipped.
1.5 Make technical presentation to each team.
2. Basic level processing
2.1 Where there are too many concave and convex parts on the surface of concrete, aerated concrete block and brick wall base, they should be leveled or repaired with 1:3 cement mortar beforehand, and the surface should be chiseled or slurried if the surface is too bright.
2.2 The holes in the wall should be blocked tightly, and the holes through the water heating and ventilation pipes must be blocked tightly with 1:3 cement mortar.
2.3 Different grassroots units
Wire mesh should be laid at the junction of different base materials. The width of lap joint should not be less than 10 cm on each side.
3. Key Construction Points
3.1 Before plastering, rules must be found, that is, square circle, horizontal line leveling, vertical line suspension, pop-up alignment and wall skirt, kickboard line.
3.2 The corner protection of indoor wall and column must be wiped out with 1:2 cement mortar. The angle protection height should not be less than 2 m and the width of each side should not be less than 50 mm.
3.3 The strength of plaster on the wall of aerated concrete block should be close to that of aerated concrete block. Coarse sand should be used for bottom ash and medium sand for middle and surface layer. Steel wire mesh should be installed at the contact between aerated concrete block wall and concrete to prevent cracks, or other effective measures should be adopted.
3.4 Before plastering the wall, the gray cake should be reinforced first, and the quantity and location must meet the requirements of the operation regulations.
3.5 Before plastering, the concrete base should be brushed with plain cement paste mixed with 2% 108 glue, and watered one day in advance to fully wet the wall.
3.6 Wall plastering should not survive at one time. Covering should be carried out after 70% of the bottom ash is dried. Surface should be smoothed before initial setting and calendered before final setting.
3.7 The plastering surface should be smooth, flat joint, straight line angle, and the base surface must be clean and flat before wall corner grouting. All dirt, grease stains, mortar flow marks and other debris should be cleaned up. Surface cracks and holes should be filled with putty and smoothed with mortar.
3.8 Set up special person to maintain with the knapsack sprayer, maintain once a day.
Latex paint wall of steel structure
1.Construction procedures:
Wall batch embedding→Local repair→Clean→Brush bottom treatment agent→First coat→Second coat.
1.1 Before brushing interior wall latex paint, scrape putty on interior wall gypsum board to levelize.
1.2 Paint construction shall be carried out on the wall after the putty scraping and leveling have been completed and the qualified experience has been received.
1.3 According to the requirements of decoration design, the grade of paint engineering and coating materials for coating construction are determined, and the materials are checked and accepted according to the current material standards.
1.4 We should carefully understand the basic characteristics and construction characteristics of construction coatings.
1.5 Understand the basic requirements of construction coatings on the grass-roots, including material properties, solidity, adhesion, cleanliness, dryness, smoothness, pH value, putty, etc., and handle the grass-roots according to their requirements.
1.6 The environment of coating construction must meet the environmental requirements of coating construction. The ambient temperature should not be lower than the lowest value of the normal film forming temperature of the coating, and the relative humidity should also meet the corresponding requirements of the coating construction.
1.7 Solvents (diluents), primer coatings, putty, etc. of coatings should be properly matched with each other, and should not be matched indiscriminately.
1.8 Coatings should be prepared before use. The construction viscosity or consistency of latex paint should be adjusted according to the construction method, construction season, temperature and humidity. During the whole construction process, the construction viscosity of the paint should be prepared by a special person, and no diluent or water should be added arbitrarily. The construction viscosity or consistency must be controlled to keep the paint from falling and wet brushing.
1.9 Before and during the coating process, the coatings used must be stirred sufficiently to avoid precipitation and to affect the coating operation and construction quality.
1.10 Before the construction of coatings, samples or sample rooms must be made according to the design requirements according to the operating rules or standards, and large-scale construction can be carried out only after qualified by the quality inspection department. Samples or between samples shall be retained until the completion of acceptance.
1.11 The order of brushing is left first, right first, up first, down first, difficult first, easy first, side first and back. When the finishing surface is vertical, the last paint should be brushed from top to bottom.
1.12 After finishing all the brushing, we should check carefully again to see if all the brushes are evenly brushed, whether there are falling, orange peel or wrinkles, and whether there is oil accumulation in the corners. If so, it should be dealt with in time.
1.13 Quality Requirements for Brushing Construction: Brushing construction requires uniform film thickness, smooth and uniform color. There should be no drawbacks such as hanging, wrinkles, bottom leakage brushing, blistering and brushing marks in construction operation.
1.14 When the paint project is completed, attention should be paid to the protection of finished products. Protect the hardening conditions of film forming and the hardened film forming parts from staining. The coatings of other non-finishing parts must be cleaned before drying.

Installation of Steel Structure Doors and Windows
1. Installation of Plastic Steel Window
1.1 Construction preparation
1.1.1 The types, specifications and opening forms of plastic and steel windows should meet the design requirements. All kinds of accessories are complete, and the products are qualified.
1.1.2 Antiseptic materials, sealants, sealing materials, protective materials and cleaning materials shall conform to the design requirements and relevant standards.
1.1.3 The construction of the window opening has been completed according to the design requirements, and the installation ink lines have been drawn.
1.1.4 Check whether the size of the window opening meets the design requirements, and if there are any problems affecting the installation of the window, it should be handled in time.
1.1.5 Check plastic-steel windows, if there are surface damage, deformation and loosening, timely repair, correction and other treatment, qualified before installation.
1.2 Key Construction Points of Window Frame Installation
1.2.1 According to the position line of the pop-up window of the 50mm line of the building, the reserved window holes are repaired according to the size of the window frame.
1.2.2 Connecting iron pieces should be fixed on the side of window frames. Plastic-steel windows with external walls should be grounded reliably and lightning-proof. Welding on windows is strictly prohibited.
1.2.3 The window frame is set up according to the design position. After the verticality and geometric dimension are found, the window frame and the wall connector are fixed with shooting nails or self-tapping screw.
1.2.4 The gap between the window frame and the opening is filled with mineral wool strips or glass wool felt strips, with 5-8 mm deep grooves on the surface of the slots and sealed with sealant.
1.2.5 After completion, peel the protective film off the window.
1.3 Key Points of Window Fan Installation Construction:
1.3.1 The installation of window fans should be carried out after the basic completion of indoor and outdoor decoration.
1.3.2 Installation of push and pull windows: divide the matched window fans into inner and outer fans: first insert the outer fan into the outer groove of the upper slideway, and naturally fall into the corresponding lower slideway, then install the inner fan in the same way.
1.3.3 The window should be closed tightly, the gap is even, the switch is flexible, and the overlap between the fan and the frame should meet the design requirements.
1.3.4 )When installing window glass, the elastic pad should be placed in the slot of the window frame to prevent the glass from contacting the window frame directly. The gap between the glass and the slot of the window frame should be pressed or filled with rubber strip or sealant.
2.Push-pull door installation
2.1 Construction preparation: Push-and-pull doorframes and fans supplied by the manufacturer shall check the type, size, quantity, processing quality and factory qualification certificate when entering the field.
Before installation, all structural works should be completed, and the quality standards meet the requirements. The indoor horizontal line has been bounced, and the doorframe against the wall has been painted with anticorrosive paint, and the other surfaces and sectors have been painted with oil once.
2.2 Key points of installation and construction of push-pull doors:
2.2.1 Installation of push-pull doorframe should first check whether the size and type of guide rail conform to the design specifications.
2.2.2 According to the 50cm line of the indoor building, the installation position line is popped up to deal with the structural edge corrugation that does not conform to the line.
2.2.3 According to the opening direction of the doorframe, the cutting direction of the door frame installation is determined. After the door frame is fixed, the hanging straightness is corrected by a line pendant.
2.2.4 Draw the size line of the door fan against the frame.
2.2.5 After choosing the hinge slot, the upper and lower hinge should be installed. When installing, a screw should be tightened first, and then the door should be closed to check whether the gap is suitable, whether the opening and the fan are flat or not. After no problem, the screw can be tightened completely.
2.2.6 Hinge hinges should be 1/10 of the height of the upper and lower parts of the door, and avoid the ups and downs. After installation, the switch should be flexible.
2.2.7 Hardware should be fully installed, properly positioned, fixed and reliable.